Tuesday, August 20, 2013

Maiden Campout


For the first campout we did not go far. Just drove about 25 miles to Hobble Creek canyon. We had a great overnighter. It's great to have everything you need back there in the galley all organized and ready to go. After we sat around the fire for an hour we watched a movie on the laptop in the camper with the Jambox for sound.
This was a great project and now that the building is over we have our little teardrop sitting out there at the side of the house ready of a spur of the moment decision to head for the hills. Next campout will be one week in Yellowstone park in a couple of weeks. I'll post a few pics.

Yellowstone trip


Cheri and I took a 35th anniversary trip to Jellystone Park in June. Five days camping in the park. It was really nice we saw so many things we had never seen before in Yellowstone. The trailer towed great and we were quite comfy sleeping at night. I was a little worried about my supply of electricity but there was no problem. The battery was still at 12.5 volts at the end of the trip and that was with a few cell phone charges and charging my laptop once from the deep cycle battery. We watched a movie almost every night.

In addition to the Yellowstone trip we have had it out on two other trips this summer. Hobble Creek and Currant Creek. Hope to get in a couple more before the snow flies.

Sunday, April 28, 2013

Moved Out of the Workshop/Garage


The Woodsman is finished! In this post I will walk through all of the finishing touches that have been completed since the last post. In the view above you can already see some of them. The entire exterior has been covered with fiberglass. I used 6oz cloth and 4 coats of UV inhibited RAKA epoxy. The sides have been given a coat of polyurethane varnish over the epoxy and the top has been given two coats of polyurethane paint over the epoxy. You have a pretty good view in these pics of the RV doors that I installed. I got these from the lil-Bear company. They were a bear to install (no pun intended) but once installed they are great doors. The most important thing is they have a good seal against rain but they also lock from the inside and out, the glass is tinted, and you can slide down a window pane to get some ventilation through a screeen. I also added some fenders. What you see here are flexy fenders. I got them from a local 4WD outfit. It's just a little rubber fender to keep the wheel splash off the side of the trailer. You cut them to length. The hatch weighed in at 65 lbs. It was kinda awkward to put up and down so I went with gas springs like a car hatchback has. Getting the right size and strength was a bit of a trick but eventually I ordered all the right parts from McMaster Carr and it's like magic now. You just get it started and then it lifts itself slowly to full open position.

 
The two pictures above are a little closer look at the galley. I searched and searched for a way to lock the drawers in placed during towing. Eventually I settled on these little bolts. Not very pretty but they will definitely do the job. When we are camped we will just unbolt them all and not bolt them again until we secure everything for the road.

Here's a closer look at the flexy fender. It is screwed from below. The pic on the right may be a little hard to see whats going on. I had built a 6 inch deep well in the floor with a lid thinking it would either be for storage or a foot well when seated on the bench. I always had in mind this table idea if I could find the hardware for it. I was in a trailer shop last week and there it was so I rigged up this little table. The table top is the cover for the well. It turned out pretty nice! So now when we're waiting out a rain storm we can listen to music and play a board game on the table. 
 

This is a closeup of one of the draw latches used to keep the hatch tightly sealed. This is a stainless steel spring loaded draw latch from McMaster Carr. This one is made special for locking. I have three of these draw latches on each side. You can see them in the first pictures of this post. I crafted the aluminum straps that wrap around the hatch lid from 1/16 inch aluminum. There is one padlock on each side. They are paired so they open with a single key. The picture on the right is the shore power receptacle. This powers the battery charger/minder and the 110 V outlets in the galley and in the cabin.
 

Detail of the rear and the front. LED tail and signal lights from lil-Bear and in the center you see a lighted license plate holder from Amazon. In the front is a detail of the battery box and the trailer jack. The battery box is fastened down with 8 screws and washers and also strapped down with a nylon strap. It is not going anywhere.
 

I have one of these LED porch lights above each door, switched from inside. The vent is a standard camper vent with a three speeds for the fan motor.

There is still one thing left unfinished. The cushions/bed. I have five-inch thick poly foam ordered and last week I bought some upholstery fabric on clearance. I should have it done before the maiden trip on Memorial day weekend.


Friday, February 22, 2013

Can You Say Woody?


The oak side panels look awesome. I confess I'm relieved to have them installed on the trailer and to see that my plan actually worked out. When I started on these wall panels I had so many questions. Would the seams between the three plywood sheets be too noticeable? Could I get the seams to lay flat? Would the border color look OK? Would my fiberglassing job look acceptable?


One of the ideas that worked out nice was to temporarily screw a one by two to the bottom of the trailer wall to act as a shelf to hold the side panels in place while I fastened them to the trailer. Each wall panel is attached using 4 tubes of Heavy Duty Liquid Nails and about 90 of the fasteners shown above. These fasteners are temporary and will be removed in a week, after the glue has set. Each fastener consists of  a one-inch drywall grabber, a thick steel washer, and a square of waxed paper. I'm pretty sure the washer would need to be removed with a chisel after a week of being held against the partially cured epoxy had I not added the waxed paper. I placed fasteners every six inches around the edge of the panel and the door opening and several more were strategically placed in the interior regions anchored into the wall frame. Next week they will all be removed, the small holes will be filled with the appropriate colored wood filler, then the final coat of epoxy will seal the filled holes.

I just can't get over what a difference these side panels make.


Wednesday, February 20, 2013

Wood Sides


I finally decided to go with wood sides instead of a fancy paint job. I located some beautiful red oak 1/4 inch plywood at Lowes. The sides of my trailer are six feet tall and 10 feed wide so I needed two and half sheets per side. Then comes the problem of stitching the three parts together for each side. I wanted to make sure that the joints are flush and I was afraid if I just screwed them to the side of the trailer and butted them together the seams might have a little waviness. I decided to stitch them together with fiberglass before I  attach them to the walls. More on that later.
I masked off a three inch border and applied one coat of epoxy resin inside the masked area. The above picture shows the pieces after the epoxy has been applied and the masking tape removed. The grain of the red oak really looks beautiful after the epoxy has been applied. Next I stained the border by freehanding it with a brush just slightly overlapping the stain onto the epoxy. This created a sharp edge to the stain. If the stain had been applied to the wood before the epoxy edge was there I would have gotten bleeding of the stain into the grain of the oak and there is no way I could have made a clean edge. Even masking it off would have bleeding underneath the tape. I used minwax water based stain.
In the above picture you can see both side panels. The one closest to the camera is in the process of being stitched on the backside with two-inch fiberglass tape. The joints are screwed in place to a 1X4 to stabilize them while the backside epoxy is curing. After the epoxy was cured I turned the panel over before removing the screws to keep it secure. I removed the screws from below after the panel was safely flipped and placed in its new position. 

The farthest panel from the camera is further along in the process. The back has already been stitched and now it is sitting front side up and the fiberglass cloth has been wetted out with epoxy. After the epoxy gels the overhanging fiberglass will be trimmed from the edge with a razor and more coats will be added with sanding between coats until a smooth finish is obtained. 

I was dreading the fiberglass process because I'm doing this in the garage and I thought the odor of the epoxy would leak into the house. I was pleasantly surprised to find that this product is completely odorless. I ordered the UV resistant epoxy from Raka. So far I have not seen any blushing and the mixed resin is quite transparent. 

Saturday, February 9, 2013

Outer Plywood


I attached the plywood today. As you can see there is a two-inch overhang which will be trimmed and sanded flush later. I used 1/4 inch plywood that is intended for exterior applications. It's the same stuff I used for the hatch in the previous post. It is glued with heavy duty liquid nails and then screwed in place with washers The screws and washers. will be removed after the glue has set.


I made two large sheets of plywood just the sizes I needed by gluing two plywood sheets together to form each of the sheets. In the left picture above you can see the two large sheets on my garage floor after I glued them together with a 3 inch wide strip of 1/8 inch masonite. These seams were glued with gorilla glue the same way as the headliner seams that are shown in a previous post. The masonite is glued on the inside so that it doesn't show, but you need to make sure it lands between the spars to you don't get a bump. It make a nice stiff joint so that when the plywood is fastened over the curve of the trailer the joint forms a continuous curve. Note the masonite does not extend to the edge of the plywood because it needs to fit within the walls so that it does not produce a bump when the plywood is attached to the walls. It worked out very nice. After the fiberglass and paint are on I don't think the seam will be visible at all.

In the right picture above it's a little hard to see what's going on. I have fastened one of the sheets to a spar of the trailer at two points and I have braced the sheet up so that I can check the fit before I glue and screw everything in place.

This week I ordered the fiberglassing materials from Raka. After the shipment arrives I will take a week off and get as much of the fiberglassing done as I can. So far I'm on schedule to finish the Woodsman in time to maiden it on memorial day.

Monday, January 21, 2013

More Progress on Galley Hatch


The upper left picture shows the hatch frame fully assembled. The upper right picture shows the 1/4 inch plywood outer skin being fastened to the frame. I first clamped the frame in place and used cardboard wedges along the sides between the frame and the outer walls to make sure I had 1/8 inch spacing on both sides. The best advice I saw for building a hatch that fits is to build it in place. Even the sturdy fame that you see here has some flexibility and if I allow even 1/8 inch of twist in the frame while the plywood is being attached the hatch will not fit properly. Clamping and wedging the frame in place while I fasten the plywood will lock it into the exact shape. First I attached the very bottom of the plywood to the frame with heavy duty liquid nails and screws along the bottom spaced every three inches. Once this was done I tied a rope from the frame underneath and passed it over the top of the trailer then tied it off to the front of the trailer frame so that I could tighten the rope and bend the plywood into shape. I then applied a liberal amount of heavy duty liquid nails to the frame where the plywood will come in contact and gradually fastened it in place with successive rows of screws about 6 inches between each row working from the bottom to the top.
 

The pictures above show the first piece of plywood after it has been completely fastened in place. The picture on the right is a closeup. I used grabber screws with washers. After the glue dries I will remove the screws and washers and fill the holes. I used 1/4 inch exterior plywood. I was surprised that I was able to bend the plywood around this curve without any cracking. The most difficult part of building the hatch has been making sure the gap for the seal is uniform. I cut the ribs of the hatch slightly oversize that then sanded them down with the orbital sander to leave a 1/4 inch gap for the seal.The plywood was cut with about one inch of overhang on each side. It will be cut to exactly fit at a later time.


Saturday, January 12, 2013

Progress on the Galley Hatch


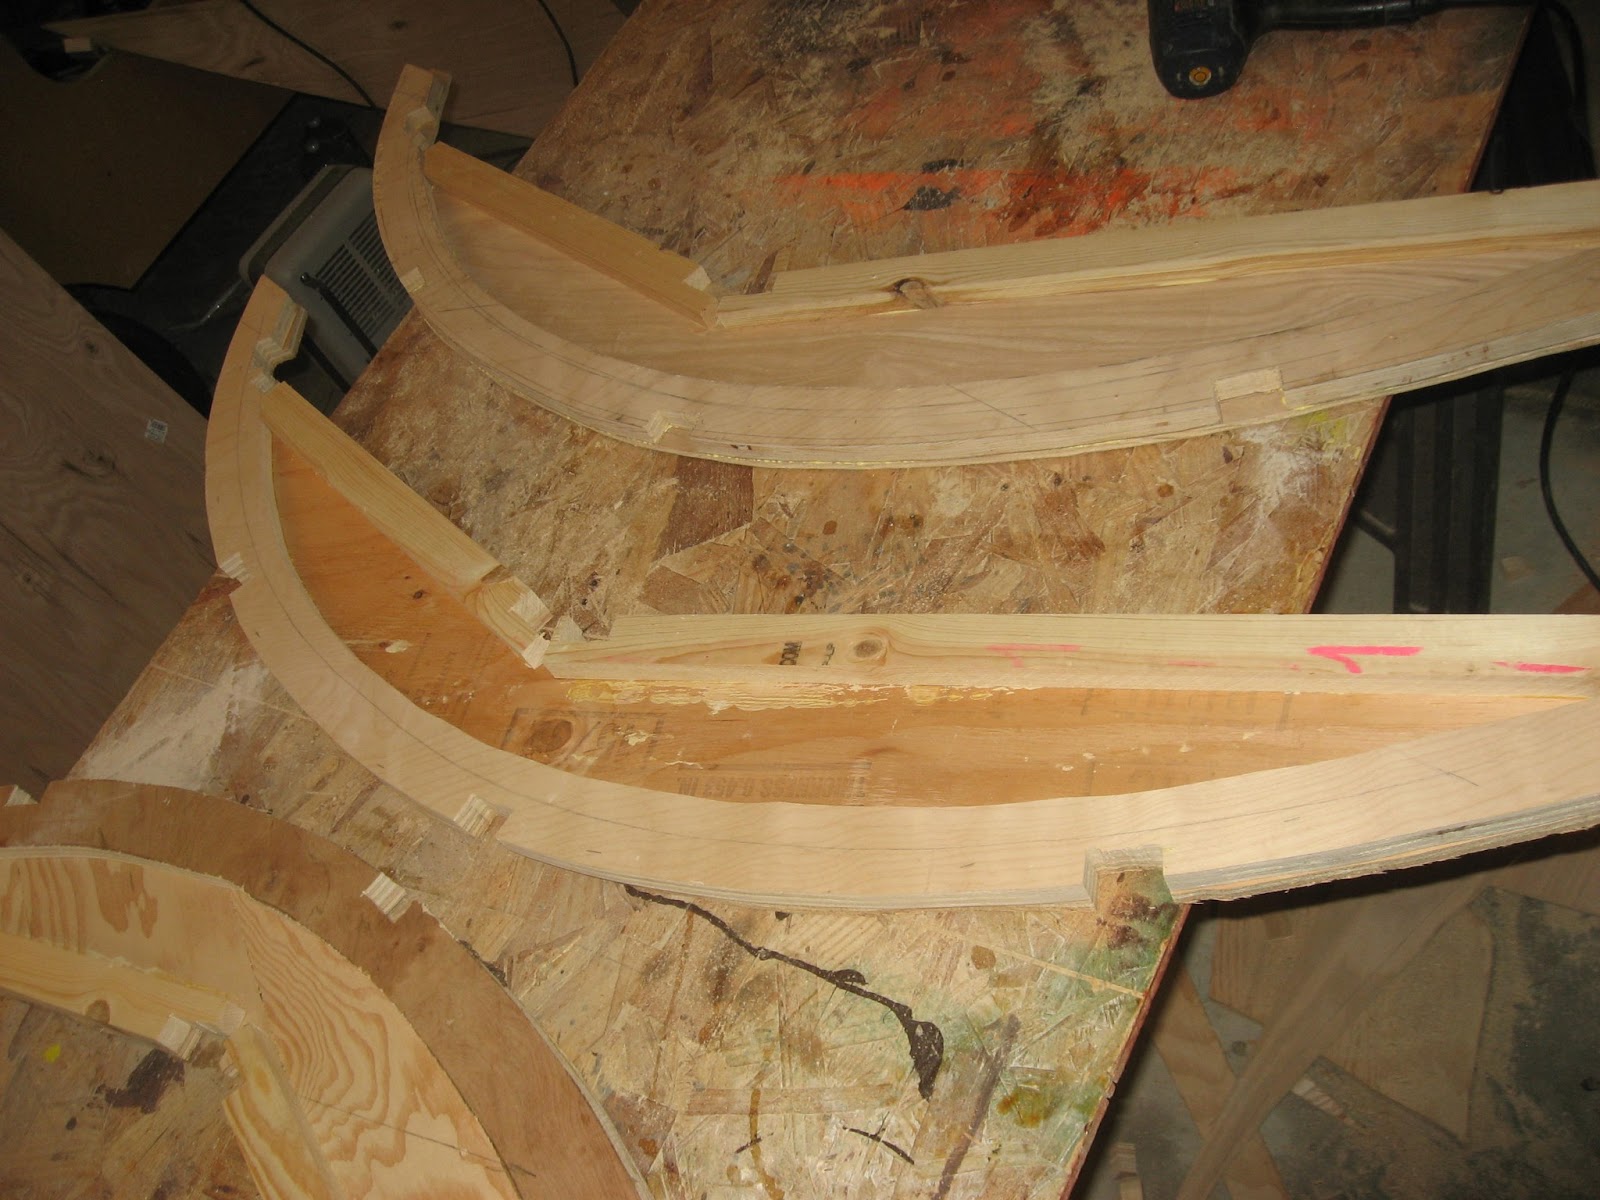
I have started on the galley hatch. At first I cut 4 spars from 3/4 inch plywood. I traced the curvature of the galley hatch onto the plywood allowing about 1/4 inch for the weather strip to seal the hatch. I cut the spars 2 inches wide. After I got them cut I started thinking about the bending stress that the spars would receive when I attach the outer plywood. Laying a spar on a flat surface with the convex side up and pressing down at the apex of the curve I could easily deform the spars by 1/2 inch. They were wooden springs! I knew that if I did not strengthen them they would deform during assembly and my hatch would no longer fit the curvature of the galley. In the pictures above you can see the remedy. I made plywood webs to turn the spars into trusses and attached 1x2 pine strips to the inside with screws and glue. This will give me a place to fasten the inner plywood panels of the hatch. If you click on the top left picture to blow it up you will see that I have cut notches on 16 inch centers for attaching horizontal members. I cut the end pieces of plywood without the notches so that from the end, when the hatch is up, you will see a solid panel of plywood.


The picture above shows the spars after they have been attached to the top and bottom rails of the hatch. I clamped it in place so that when I add the horizontal members I can cut them and place them in such a way that the hatch will fit perfectly in its space. I am allowing 1/8 inch of clearance on each side for the opening and  closing of the hatch. I also have a 5/16 spacer clamped in place at the top to simulate the width of the hurricane hinge and a 3/16 spacer holding up the bottom rail to provide a little clearance at the bottom for opening and closing. This hatch design solves another problem that I previously didn't know quite how to solve. I have been worried about the drawers coming loose during travel. I used those little compression latches with two little plastic wheels that clamp on to a wedge when you close them but these are not very strong so I was wondering how to lock the drawers closed. In this design the inner plywood of the hatch will be about one inch away from the knobs of the drawers when the hatch is closed. By attaching small pieces of the foam to the inside of the hatch right were the knobs are I will be able to keep the drawers in place just by closing and latching the hatch. Next Saturday I should be able to get the rest of the hatch structure finished and with some luck I will get the exterior plywood bent onto the hatch as well. On the right I added a picture of the interior cabinets with stain and varnish. I also painted the internal walls.